How to Build a Fermentation Fridge – DIY Brew Fridge
The lovely long hot summer we’ve had this year has had one major drawback; I’ve not been able to brew as it’s been too warm for fermentation in the house and stocks are beginning to run low! Most yeast that you use to brew beer likes to ferment around the 20C mark, above 22C you start to get off flavours and fusel alcohol. To get brewing again I decided it was time to make a fermentation fridge.
A fermentation fridge, or brew fridge as it’s sometimes known, is just a normal larder fridge with a 1ft greenhouse heater and an STC-1000 to control the temperature. You simply set the desired temperature into the STC-1000 and it switches the fridge on if it gets too warm and the heater on if it gets too cold.
Being a bit of a novice when it comes to electronics I was slightly nervous about wiring things up (also I was instructed “not to burn the house down”) I found some great guides on the home brew forum and a clear and simple video on Youtube. These were really helpful and actually made building the brew fridge quite an easy process.
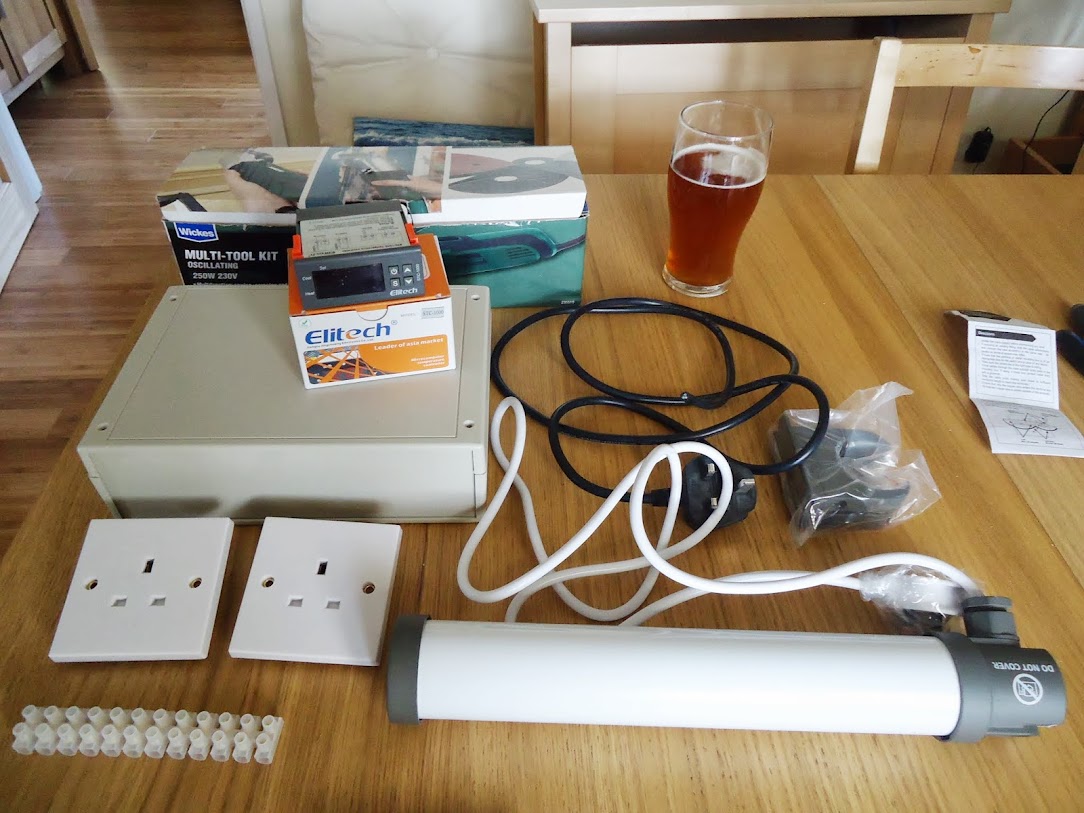
What you need to build a Fermentation Fridge for your home brew
- A larder Fridge – I got mine via Preloved for £20
- STC 1000 – Ebay or Amazon for around £14.50 -£20
- 60W 1ft Greenhouse Heater – Amazon or Ebay £13-£17
- Project Box – Maplin/Amazon £10 (lots of people use sandwich boxes for the electrical bits)
- 3 core wire – I used an old monitor cable but it’s pretty cheap to buy online
- 2 plug sockets and Terminal Block -Wickes £4.50
Update: For those less confident around electrics (or who just don’t want the faff) the ready made controllers from Inkbird are getting good reviews. There are two models; the standard Inkbird termperature controller for around £35, or a wifi enabled verison for around £35.
Putting the control box together
All the bits ready to go, and a beer of course
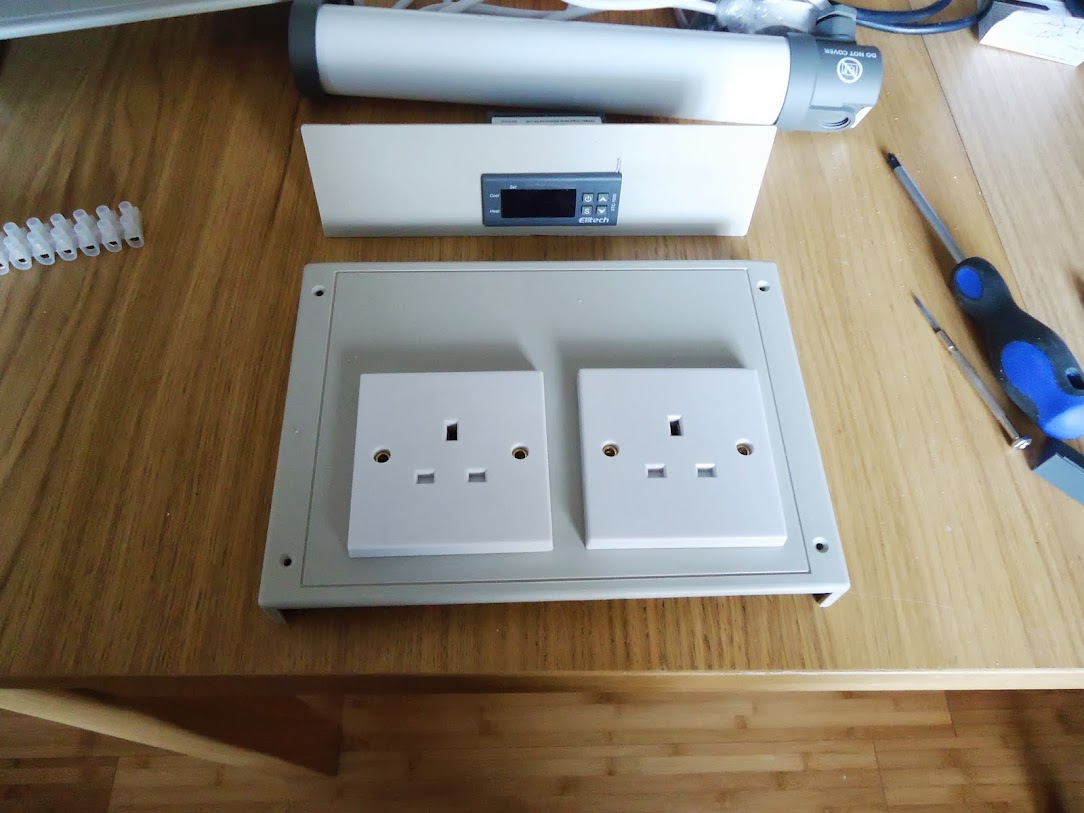
Holes cut into the top and sides of the project box using a multi-tool. I then stuck the sockets on with super glue.
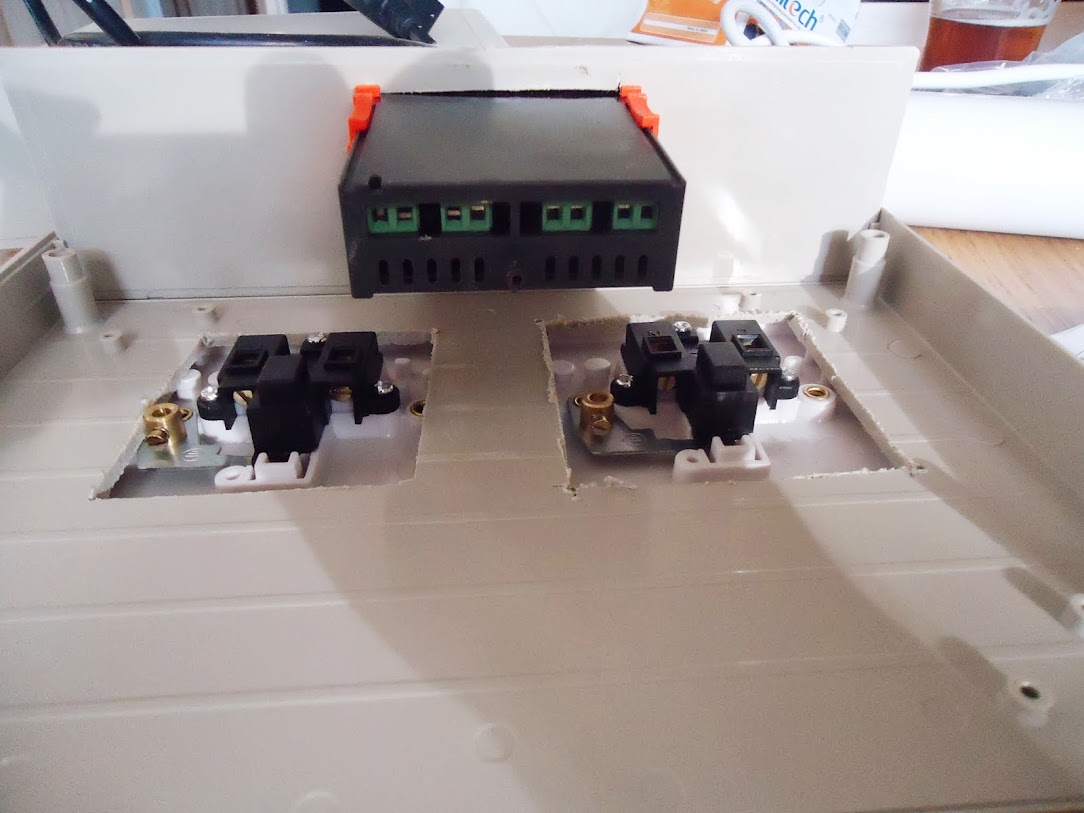
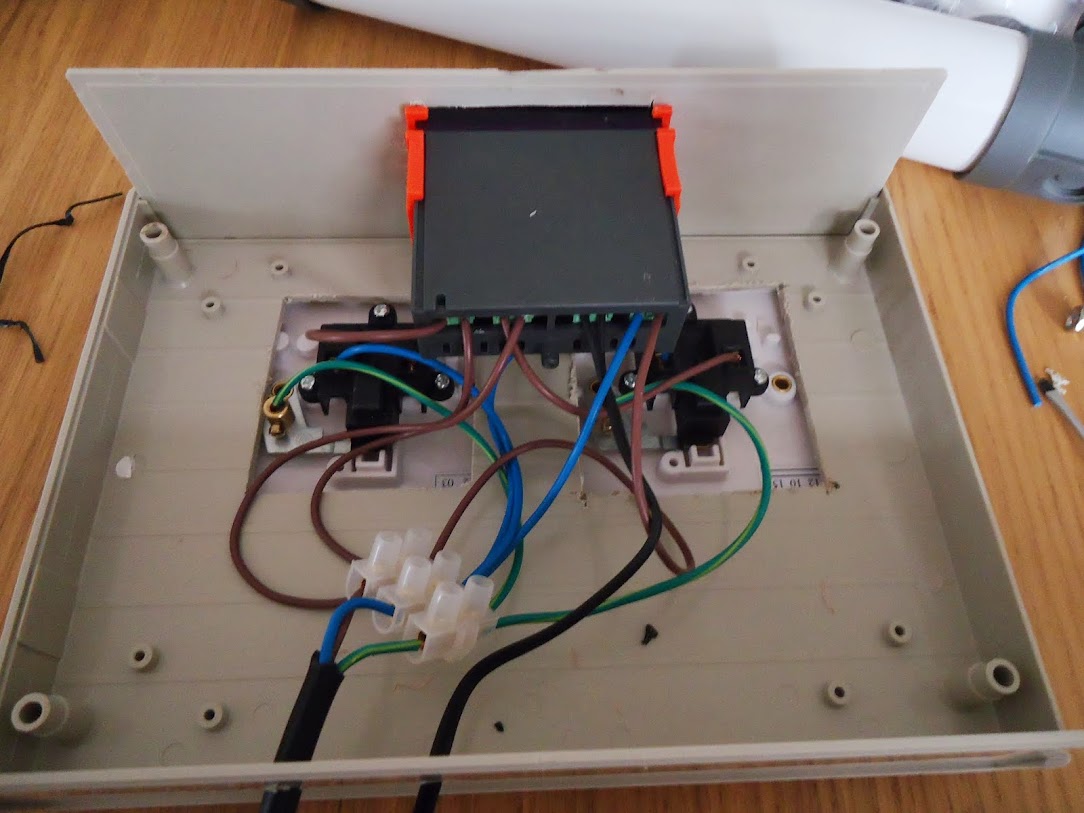
The inside of the box
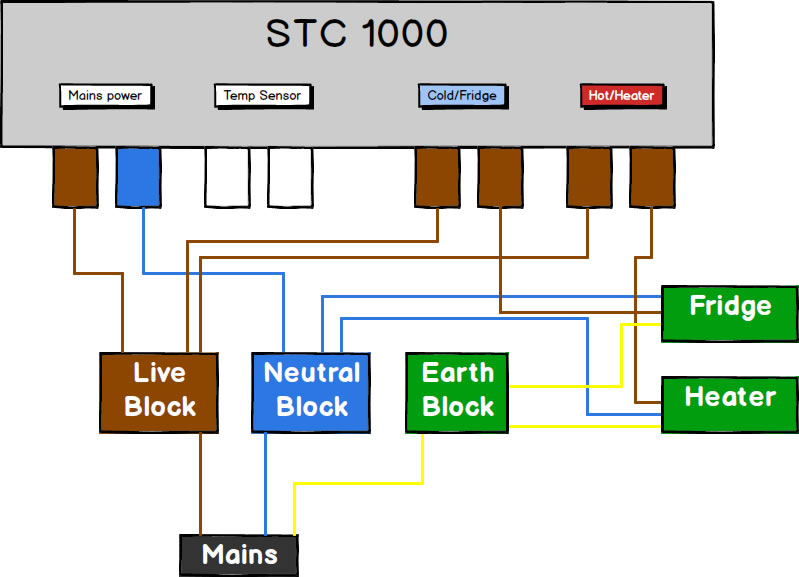
STC 1000 Wiring Diagram (your hot and cold may be the other way around, make sure you label the socket correctly)
All wired up and ready to assemble the box
Testing it to make sure it works, amazingly it did!

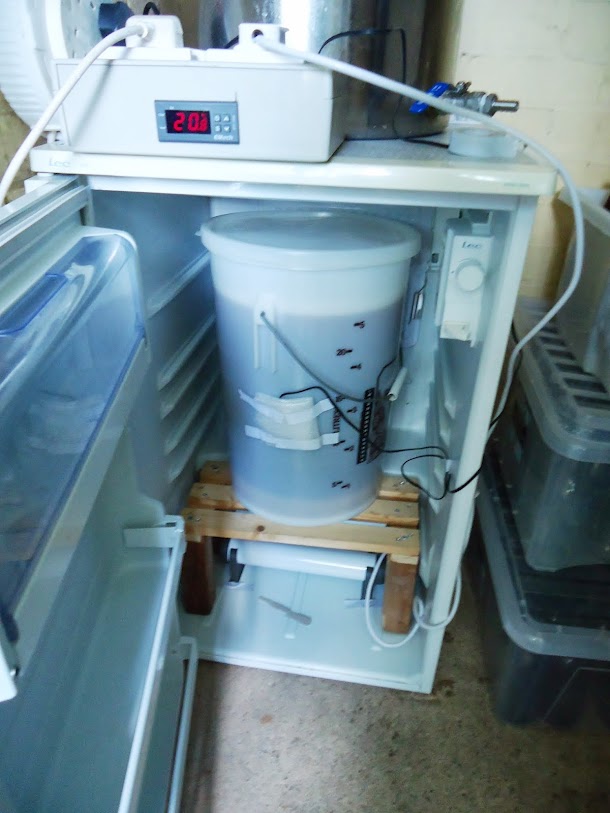
Heater and fridge plugged in, set to 20C and an FV full of my Sierra Nevada Pale Ale clone ready for fermentation.
Making a Brew Fridge
This really was a lot simpler than I thought it was going to be, there’s lots of wiring diagrams available to help with that side of things but once you get the logic it’s pretty straightforward.
The fridge has more uses than just fermentation, at some point I may try a lager which ferments at a cooler temperature and then needs to stored (or lagered) at a cold temperature for a period of time, I can now do this as the fridge works down to about 1C. I’ll also be able to crash cool my FV at the end of fermentation to help clear my beer ready for bottling, this is something I’ve only been able to do in winter.
Affiliate Disclosure: Hey Brew Enthusiasts! We want to be transparent with you. This article contains affiliate links, meaning, at no additional cost to you, we may earn a small commission if you make a purchase through these links. Your support helps us keep the taps flowing with great beer. Cheers to happy brewing!


Nice work, I used one of those temperature controllers for my mushroom grow room.
Has it made brewing easier?
I’m about to embark on a kit brew and was testing the temperature around the house today – seemed to be a little too warm for ideal brewing temperature when the heating had been on all day
It’s certainly made it easier to keep it at a constant temperature and think it will come into it’s own in the summer as I will still be able to brew this year whereas last year I had to stop as couldn’t keep the temperature down.
It’s also helped in that I can crash cool at the end of fermentation which helps to clear the beer ready for bottling.
Great info and really helpful thanks as I’m looking at attempting this very soon. Got my eye on a couple of fridges on eBay. Just one question though is there room for an airlock on top with a fridge this size ? Cheers.
Hi Craig,
I don’t use airlocks myself so not overly sure. I think it depends on how tall your FV is and how tall an airlock you’re using. I’ve a spare FV that’s quite short and probably would fit one, though the one I usually use to ferment in would be too tall. If it helps at all the height of my fridge from the stand the FV sits on to the top of the fridge is 53cm, obviously this may vary a little depending on your fridge.
Hope that helps!
Cheers for the reply. Very helpful. Think I might have to change my FV but I guess that means I’ll have to brew more! Thanks again for a great guide on the brewfridge.
Where did you put the probe? Do you get any big teerature swings. I am bulding something similar and am worried that heater stays hot for some time after turn off. I understand the mass of wort will respond slowly. Hence my question about whether you monitor wort temp or the ambient air temp.
I’ve made a little bubble wrap pocket which I tape to the side of the FV, you can see the first version of this in the final pic (i’ve since made a better one), this means it should be measuring the wort temperature rather than the ambient temp. I’ve heard of others just putting the probe right into the wort, though that means you’d have to clean and sanitise you probe. Overall you should be measuring the wort temp rather than than the ambient temp.
As you say the wort responds slowly, I have the STC1000 set up with a +/-0.5c tolerance which accounts for the heater staying on for a bit. Though as it’s only a 60w heater it doesn’t get too hot really and cools down fairly quickly.
Dear Jimmy!
It’s a great solution for me too without a cellar under the house. I have a question about the function.
If I understand that is the STC-1000 switching the fridge and the heater on and off? It depends on the temperature that I set to the STC, of course.
Hi
Yes the STC1000 will switch between the fridge and heater as needed. So say if you set the STC1000 at 20C with a +/- 0.5C tolerance when it reaches 20.5c it will turn the fridge on, when it reaches 19.5C it will turn the heater on. You can set the tolerance lower if you wish. You can also set a delay of up to 10 minutes so that it doesn’t just keep switching between the 2 constantly.
Thanks for the answer!
This is my next DIY project!!!
Bye
This is great – just about to build one. In terms of the probe and bubble wrap pocket – do you mean you literally got some bubble wrap and taped that over the probe onto the side of plastic fermenter? And that takes the temp of the wort?
Hi Matt
Yes that’s it exactly. The bubble wrap holds the probe against the side of the fermenter which will be the same temperature as the wort within the FV. It also insulates it from the temperature of the air in fridge which could fluctuate in temperature a lot more quickly than the worth will. Some people dunk the probe straight in the wort, I prefer not to so as to reduce the chance of adding bacteria from not cleaning the probe properly.
Hi Jimmy,
This looks great – just preparing to do something similar. Quick question – hope I’m not being a dullard: how do you close the fridge door with all those wires hanging out?!
Thanks!
Hi Sam
The wires are small enough that the magnets on the door seal on my fridge are still strong enough to keep the door closed, just with a small opening around the wires. Some people feed the heater wire, which is the bigger of the two, out through the condensation hole at the back of the fridge. The temp sensor wire is very thin so doesn’t really affect things. So guess my advice is experiment, if the door closes with the wires trapped then you’re good to go, if it wont stay closed you may need to route the heater one through the condensation hole.
Good luck with your build!
Thanks for all the info but what happens to the fridges built in temperature regulator?
You override it with the STC1000. So the fridge only gets power when the STC1000 switches it on, then once it’s back down to the correct temperature it switches it off again.
righty o buddy,,,,, Like your idea of the bubble wrap,,,just need to find a cheep fridge & I will be in business; the trouble is I live in rural Wales & nothing is on your doorstop.
Good luck! hope you find one soon!
4got to mention I saw a tip on youtube…….the guy put cable ties around the individual cables on the inside of the box & providing the holes aint too big it helps prevent the connections being pulled out.
many heaters have a thermal cut-out at 15 degrees, how will the fridge ever reach 20 degree ferment temps if this is the case.
The greenhouse heater tubes aren’t very sophisticated, if they’re plugged in with power then they’re on until they’re unplugged/power removed. Mine’s always worked even when it was -4C in my outhouse over xmas.
What amp Terminal Block is it that I need?
Just had a look and the one I got was a 15 amp one
Thanks Jimmy! This is the last item I need. happy brewing 😉
That’s it built and running. How long does it take for the temp to settle?I put the wort in lastnight and its sitting about 18c (set to 20c) and dosnt seem to be climbing anymore. Patience the key here?
Yeah it could take a few hours at least to get up to temp. I assume the ‘heat’ light on your stc is showing? is your heater kicking in?
Its all good today, sitting perfect and bubbling away. I guess it just takes some time for temps to equalise. Thanks again for the great guide and speedy follow up advice!
Excellent, happy to help and hope you get some good beer from it!
Hi, great post this, i have one question, can a double plug socket be used instead of two singles ? or would it mean that they are both trying to power at the same time ?
Cheers Damo.
I think it depends on the double socket, if you can wire each one individually then it’s fine. I just checked one I had laying around and that only had one live and one neutral fitting so wouldn’t be able to use it as the STC1000 needs to be able to switch the power to the different sockets.
Hi Jimmy
Great post and i’m in the process of building mine following your guide, however i’ve read on another forum that its a good idea to add an inline fuse, is this completely necessary ?
Hi Richard
I’m not an electrician so I can’t really give you a definitive answer. However it’s not something I’ve seen or read in other guides. I guess the fuses you have in the various plugs should take care of any issues. An inline fuse I guess gives a bit more safety if there ever was an issue, but not sure it’s really necessary. Good Luck with the build!
A quick and cheap heating solution: A simple lamp holder and a light bulb of 60 Watts. As long as you can buy light bulbs. A light bulb delivers about 5% light and 95% heat
Yeast and beer prefer the dark, light can impart some pretty nasty off flavors (there’s a good reason why sol and Corona are the only lagers in clear bottles and then served with lime, ever tried them without?).
I suppose you could put the bulb in a tin can, and build a stand to hold it off the plastic, but really a greenhouse heater is £10 and just plugs in so not really any more expensive than a bulb holder, plug, cable, and time assembling it all. And on top of that the usual instruction form indoors “you can do whatever you like as long as you don’t burn the house down”.
Great article. Is that a 30 litre FV in the picture? If so which make and model is the fridge? I’m struggling trying to find a fridge that will house my 30ltr fv’s with an airlock. Many thanks.
Hi Jimmy,
I’m in the process of doing a fermentation fridge, which fridge do you have? I only ask as it looks like you can fit a 30ltr FV in it and would prefer an under counter fridge that could accommodate a 30ltr FV with airlock/blow off tube.
Thanks
Adam
Hi Adam,
Apologies for the slow reply, your messages had gone into the spam folder for some reason! The FV is just a standard 25 litre one (which I think are 30 litre to the brim), the one in the pic is actually a bit taller than the ones I use now which I got from Wilko. I don’t use an airlock personally but there should be room for one. In terms of the fridge mine is an oldish LEC one, pretty much any freestanding under counter larder fridge should be tall enough. Hope you find one soon!
Hi Jimmy. This is a great article and I have all the parts including the fridge ready to put together tomorrow. Fingers crossed!! Quick question….I brew ale and Pilsner and the latter typically needs to be fermented at 12 degrees. Once I have wired the STC up and it is working, will the STC control the temperature correctly downwards? I think the answer is yes from one of your previous responses to a question but thought I’d double check before I start a Pilsner brew. Simon.
Hi Simon
Yes the STC will keep the temperature at whatever temp you set it at. So in your case the STC will just kick the fridge in until it gets down to 12 degrees, then if it goes down too much the heater will kick in, if the temp rises the fridge will kick in again. I have mine set with a 0.5 degree range, so it would keep it between 11.5 and 12.5 in your example, that way it stops it constantly switching between the fridge and the heater.
Just bought a tube heater that cuts out at 15 degrees.
Great brew fridge. I’m about to start making my own, can you give me the model number of the heater you have? I don’t want to buy one that cuts out below 20degC.
Thanks, Ed
Hi Ed
The one I got is the one linked above from amazon (this one)- I’ve had no problem with it cutting out at all and find it surprising that some do, since they’re essentially designed to maintain a low temperature in a greenhouse. Mine was running for the last few weeks in the brew fridge in my outhouse which was around 3degC overnight.
Cheers
Hi I wonder if you have encountered this: I have stc1000 all hooked up and running but for some reason my fridge refuses to work. Sometimes it does when I switch off the estc for a while. Any idea? All setup correctly- degrees(4) delay etc. But…
Forgot to mention that the fridge is outside under roof. Cheers Tom
Hi, I assume the fridge works when plugged straight into the mains? Have you checked the wiring to make sure there’s not a loose connection? Another thought is the STC has a time delay too (to stop it switching constantly between heating/cooling) so it could be the time delay hasn’t expired yet?
Many thanks for a really excellent set of instructions. The video on YouTube was also really helpful. I’ve built one to store a mini Polypin of cask condition beer at the right temperature (11-13’C) in a spare fridge during the summer months. The links to Amazon were really helpful and I ordered all the kit in one go. It wasn’t that hard to do – well within the capabilities of a competent DIYer. Much better than the alternative of wet towels and ice packs etc. The proof will be in the drinking but just wanted to express my gratitude for putting this info online – many thanks Charlie
Hi Charlie
Glad you found the fermentation fridge guide helpful, hopefully you’ll have lots of great beer to drink over the summer!
Cheers
If anyone’s building a controller like this I’d rather they screwed their sockets to something than used superglue, secured the terminal block to something inside the case, and clamped the mains cable inside the case so it can’t pull out – and definitely wouldn’t construct mains kit in a sandwich box! I guess it’s unlikely to kill anyone if it’s set up in one place and not moved around often, and only people who know what it is have access to it, but that can’t always be guaranteed. Also if you were to build it in a metal box, the box itself would also need to be earthed.
I’ve seen ready-built heating/cooling controllers on eBay for thirty quid which is probably less hassle unless you already have the parts for this kicking about.
Tom, buying one is definitely an option , but wheres the sense achievement ? after all we are making our on beer ( for the same reason) not popping to the supermarket for it
nice to know theres an alternative though for those whos DIY skills are not upto the build .
Hi Jimmy
It’s taken me a couple of weeks to get all the bits together but finally finished my brew fridge yesterday (following all of your instructions). It works perfectly and I now have my first extract brew fermenting away at a steady 20 degrees. Many thanks for the excellent post and instructions!
Hi Richard, glad my brew fridge guide helped you out, hopefully you’ll get some great beer from it!
Thanks for the good advice, done just as above and up and running.
Hi I’ve not red all the posts so you may have been asked this but can you drill the side of the fridge to run your wiring through for the heater and the thermostat (and silicon seal) to get a better door seal.
Thank John
Hi John, you can but you run the risk of going through some of the fridge’s cooling pipes. If you know exactly where they are go for it, but could be risky. Alternatively you can run the heater wire out through the condensation drip hole at the back. It may also fit the thermostat but could be tight.
Cheers just need an old fridge got the rest on standby on Amazon
Hi
What sized project box did you use for the build pleas?
Hi mine is 18cm x 25cm x 8cm, looks like the one i’ve linked to above is no longer available so I’ll try to find one and update it. To be honest unless you really want to do the full build you’re better off getting the inkbird one now that’s all set up ready for you.
I take it it can be used for the secondary fermentation, at what temp would you set that for?? DAVEH
Hi Dave, yes it can be used for secondary fermentation if you wish. I guess the temperature depends on the style of beer, the yeast used etc. It’s not something I do so can’t really offer advice beyond you can set the fridge to whatever temperature you need it.
just come accross your info looks great just got a 55 inch larder fridge for 20 quid and have ordered all the other bits on your list apart from the box from maplin which doesnt look like they do any more but will pop in and look what else they have, i know Larger is a bad work in the home brew network but you like what you like so this may give me a chance to have a go thanks for the post ive got some st peters golden ale on the go in a water bath this may make things easier
HI James,
Just stumbled across your page showing your fermentation chamber build.
I did mine the same way, except I used a heater belt (I had it there already), even down to the bubble wrap holding the temp probe about three years ago. Works a dream
Unfortunately my fridge compressor has decided to die.
I’m now wondering if I could get away with just a couple of small fans (large PC type?) to create an airflow, ie one fan blowing in, while the other blows out?
I’m thinking that this may be enough to drop the temp back into the selected fermentation temp.
As I’m planning to move the fermentation chamber out into the shed once I’ve got it wired for electricity I don’t really see it being a problem.
Your thoughts?
Regards
Dave B
Hi Dave
They could well be enough to keep the temp where you want it, however if you wanted to crash cool, or ensure proper temperature control you’re probably better off getting a new fridge. Keep an eye out on freagle/freecycle, they come up fairly often. Otherwise I’ve seen a few free or cheap on facebook martketplace recently, plus the usuals; ebay, gumtree etc.
Good luck
Hi Jimmy,
Thanks for your reply.
While idly flicking through Gumtree I found a fridge going for free locally.
So I snatched it up.
It was a bit grotty, but a couple of hours and some elbow grease has got it cleaned up.
My plan this time is to modify the BrewPi fridge mod and hardwire my STC1000 to the fridge.
Regards
Dave B