Essential Homebrew Equipment – Refractometer
A refractometer is one of the pieces of brewing equipment I bought on a whim but it turned out to be a great purchase. Checking the gravity of your wort while you’re brewing is a fairly important factor in producing a good quality beer and a refractometer can make your brew day much easier. Most brewing software such as BrewMate and BeerSmith will give you the expected gravity at specific points of the brew day such as post mash/pre boil and at the end of boiling. Hitting these target gravities means you will get the final gravity you were aiming for.
Originally I used my trusty hydrometer to take these readings throughout the brew to make sure I was on target. It worked ok but it was a somewhat slow process due to having to cool the wort to 20°C for an accurate reading, not to mention a waste of potential beer!
Brewing Refractometer vs Hydrometer
When measuring with my hydrometer I would take a sample into and try and cool it in a bowl of cold water or ice as quickly as possible until it was at 20°C, this usually took a while and I ended up using temperature correction charts as I was too impatient. Though not a major hassle it added to the amount of things to do on a brew day.
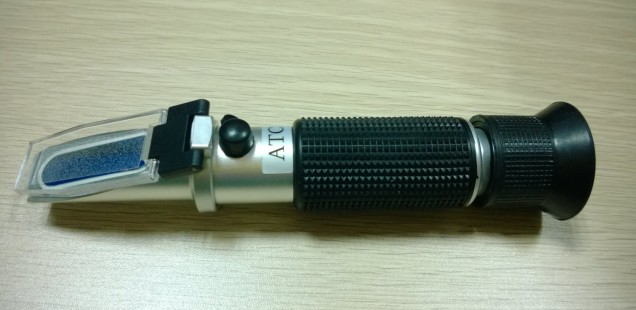
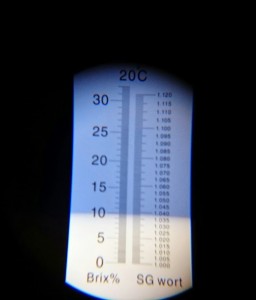 With the refractometer it’s much easier, I simply take a small sample from the boiler with the pipette that’s supplied, put a few drops on the glass and hold it up to the light. This gives me a near instant reading of what the SG is. The image shows the reading from a brew, not a great picture but gives you the idea. The one I have has two scales Brix% and SG, I mainly use the SG scale while during the brew, but it’s worth noting down your pre fermentation Brix reading too. You should calibrate your refractometer now and again by testing with a little distilled water (it should read zero).
One drawback to a refractometer is that it’s of limited use ones fermentation starts and you can’t rely too much on it’s readings so you may be best sticking with your hydrometer from here on in.
However, remember that Brix number I told you to write down? You can use this to give you an idea of the SG during fermentation. All you need to do is enter the original Brix and current Brix readings on Northern Brewers Calculator and it will give you the current SG. You may still want to verify it with your hydrometer though to be sure.
Using a Refractometer when Brewing
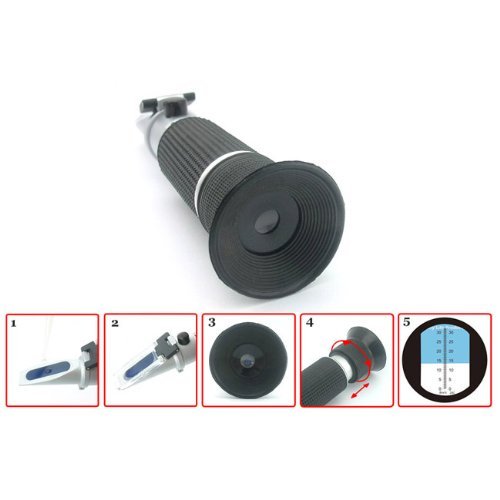
As mentioned the process is pretty straightforward;
- Take a sample from your mash tun or boiler with the pipette and put a few drops on the glass
- close the plastic flap to trap the drops and spread them out
- hold the refractometer to the light and look through the lens
- If scale or line are blurred turn the lens to focus
- Take the SG reading from the right and Brix reading from the left.
Buying a Brewing Refractometer
As with anything in brewing you can spend pretty much what you like on a refractometer. I paid £26 for mine on Amazon, I got the Barsoom Refractometer for Measuring Alcohol Content for Beer or Wine 0-25%, there are others available but I wanted the smaller scale as wasn’t going to be doing high alcohol brews. Cheaper ones are available, the DecentGadget Brix Refractometer Measure Sugar content for Beer Wine is well rated at £17.99. The main thing to look for is that it is for testing sugar, they’ll usually say for beer, wine or brewing on them.
Of course if you want to go all out and get an electric one you can, there’s the Hanna Instruments HI-96801 Digital Refractometer for a mere £195!


